Showing posts with label baking. Show all posts

Monday, March 29, 2021

Alabama Orange Rolls

Alabama Orange Rolls by freshfromthe.com
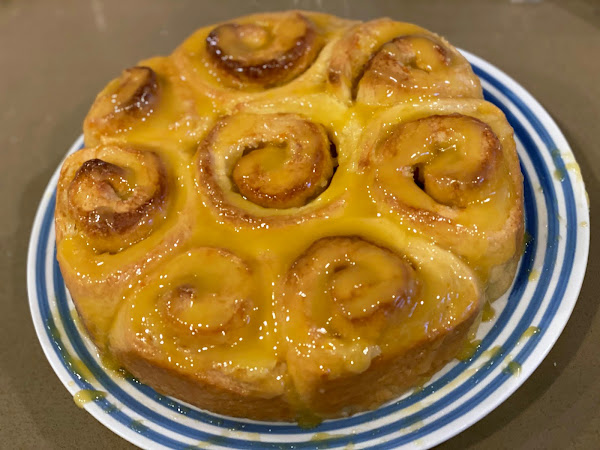
When you want a delicious, ooey gooey sweet roll for breakfast, the first type of roll you probably think of is the classic cinnamon roll. And while cinnamon rolls are definitely amazing, might I suggest you try something a little different and go with these orange rolls instead? They're still ooey and gooey and sweet, but also offer a little extra tang and don't veer into the too sweet territory.
Alabama Orange Rolls by freshfromthe.comNow, like any yeasted dough, you're gonna have to plan ahead for when you want to eat these. These aren't a roll you can just bust out in a half hour, there are multiple rises and waiting for them to cool before glazing... all of that good stuff. If you want to start making them in the morning, they're more of a brunch situation than breakfast, if we're being honest with ourselves.
Alabama Orange Rolls by freshfromthe.comThe original recipe for these rolls calls for using a dark 9-inch cake pan, and you can see I most certainly did not do that here. A dark pan will cook them faster than a light pan, and will also give you crisper edges. Now, personally, I prefer the roll to be soft all around rather than hard on the outside and gooey on the middle, so I was perfectly happy with the light pan results. But if you enjoy the hard outside and soft middle type of thing, you might want to try a dark pan. Either way, they'll turn out delicious, though. So if you love rolls and you love orange, get to it!
Alabama Orange Rolls by freshfromthe.com

Write recipe photo description here

Amazing brunch rolls that have just the right amount of sweet and tangy orange flavor.

Ingredients:
    Dough:
  • 3 cups (15 ounces) all-purpose flour
  • 1/4 cup (1.75 ounces) granulated sugar
  • 2 1/4 teaspoons instant or rapid-rise yeast
  • 1 teaspoon salt
  • 1/2 cup orange juice, warm (110 degrees F)
  • 1/4 cup heavy cream
  • 6 tablespoons unsalted butter, cut into 6 pieces and softened
  • 1 large egg plus 1 large yolk
  • Filling:
  • 1/2 cup (3.5 ounces) granulated sugar
  • 2 teaspoons grated orange zest
  • 2 tablespoons unsalted butter, softened
  • Glaze:
  • 1/4 cup heavy cream
  • 1/4 cup (1.75 ounces) granulated sugar
  • 2 tablespoons orange juice
  • 2 tablespoons unsalted butter
  • 1/8 teaspoon salt
Instructions:
  1. For the Dough: In a stand mixer bowl, whisk flour, sugar, yeast, and salt together. Add orange juice, cream, butter, and egg and yolk. Using the dough hook, knead on medium speed until dough comes together, about 2 minutes. Increase speed to medium-high and continue to knead dough until smooth and elastic, about 8 minutes longer. Dough will be nice and soft.
  2. Transfer dough to lightly floured counter and knead until smooth ball forms, about 30 seconds. Place dough in a greased large bowl, cover tightly with plastic wrap, and let rise in a warm place until doubled in size, 1 1/2 to 2 hours.
  3. For the Filling: Combine sugar and zest in a small bowl. Transfer dough to lightly floured counter. Roll dough into 16 by 8-inch rectangle with long side parallel to counter’s edge. Spread butter over surface of dough using small offset spatula, then sprinkle evenly with sugar mixture. Roll dough away from you into tight, even log and pinch seam to seal.
  4. Grease 9-inch cake pan, line bottom with parchment paper, then grease parchment. Roll log seam side down and cut into eight 2-inch-thick slices using a serrated knife. Place 1 roll in center of prepared pan and others around perimeter of pan, seam sides facing center. Cover with plastic and let rise in a warm place until doubled in size, 1 to 1 1/2 hours. Adjust oven rack to middle position and heat oven to 325 degrees.
  5. Discard plastic and bake rolls until golden brown on top and interior of center roll registers 195 degrees, 40 to 50 minutes. Let rolls cool in the pan on a wire rack for 30 minutes.
  6. For the Glaze: Once rolls have cooled for 30 minutes, combine all ingredients in a small saucepan and bring to a boil over medium heat. Cook, stirring frequently, until large, slow bubbles appear and mixture is syrupy, about 4 minutes.
  7. Using spatula, loosen rolls from sides of pan and slide onto platter; discard parchment. Brush glaze over tops of rolls and serve warm.
Recipe from Cook's Country
Alabama Orange Rolls by freshfromthe.com

Tuesday, February 9, 2021

Oat and Pecan Brittle Cookies

Claire Saffitz's Oat and Pecan Brittle Cookies, by freshfromthe.com.
Are you a Dessert Person? If so, then you've come to the right place, because today's recipe is straight out of Claire Saffitz's cookbook called, fittingly, Dessert Person. If you're like wait, that name sounds familiar, where do I know that from -- Claire used to work for Bon Appetit, and hosted several YouTube series for them. Now, she's got her own series, where she makes recipes from her cookbook. One of the first episodes she did was actually for these cookies. And I can report that, after having made them twice now -- these cookies are legit.
Claire Saffitz's Oat and Pecan Brittle Cookies, by freshfromthe.com.These cookies are chewy, sweet, with a bit of crunch from the pecan brittle that's not only in the flour mixture, but also in bits throughout the cookies as well. They are definitely a labor of love -- these aren't cookies you can just decide you want to make and be eating in 30 minutes. Indeed, if you want to make these cookies the best they can be, then you're going to have to let the dough rest in the fridge for at least 12 hours. Again, labor of love, but honestly? Worth it.

Also? They have brown butter, and if you know me, you know I love brown butter. What's not to love? Any time I brown some butter, and that lovely, nutty aroma starts wafting up, it's amazing. Claire has said she struggles not to put brown butter in every recipe and, girl, I totally get it. It almost always makes things better. 
Claire Saffitz's Oat and Pecan Brittle Cookies, by freshfromthe.com.
One thing I do want to mention is that you should not overcook these. If the very center of your cookies look a little underdone, but the edges are nice and brown after the first amount of baking time, take 'em out. The centers will continue cooking on the pan for the five more minutes you leave them on there, and if you overcooked them at all, they will turn out much crunchier in the end. Of course, if you prefer a crunchier cookie, then more power to you, go ahead, but I personally love it when you get a nice, soft center.

Another tip -- if you don't want to bake all of these cookies are once, then you can totally freeze the portioned dough to bake up some fresh cookies on another night when you're having a craving. Same oven temperature, close to the same amount of time. Frozen portioned cookie dough is something your future self with be grateful for, and I highly recommend it.


Write recipe photo description here

Amazing sweet, salty, chewy, crunchy, delicious toffee-y oat and pecan cookies worth the effort.

Ingredients:
    For the Brittle
  • 1 1/4 cups coarsely chopped pecans (5 oz / 142g)
  • 3/4 cup granulated sugar (5.3 oz / 150g)
  • 4 tablespoons unsalted butter (2 oz / 57g)
  • 1/2 teaspoon baking soda
  • 1/2 teaspoon kosher salt (Diamond Crystal brand)
  • For the Cookies
  • 2 sticks unsalted butter (8 oz / 227g), cut into tablespoons
  • 1 1/3 cups all-purpose flour (6.1 oz / 173g)
  • 2 teaspoons kosher salt (0.22 oz / 6g)
  • 1 teaspoon baking soda (0.21 oz / 6g)
  • 2 cups old-fashioned rolled oats (7 oz / 200g)
  • 3/4 cup packed dark brown sugar (5.3 oz / 150g)
  • 1/2 cup granulated sugar (3.5 oz / 100g)
  • 2 large eggs (3.5 oz / 100g), cold from the fridge
  • 1 tablespoon vanilla extract
Instructions:
    For the Brittle:
  1. Arrange an oven rack in the center position and preheat the oven to 350F. Scatter the pecans on a small rimmed baking sheet and toast, tossing halfway through, until they're golden and nutty smelling, 8 to 10 minutes. Remove the baking sheet from the oven and set aside to allow the pecans to cool.
  2. Meanwhile, line a small rimmed baking sheet with parchment paper and set aside (I only have one small baking sheet, so I just put the pecans from above into a bowl and then used the same one). In a small saucepan, combine the granulated sugar, butter, and 2 tablespoons of water (1 oz / 28g) and cook over medium-low heat, stirring gently with a heatproof spatula to dissolve the sugar. Increase the heat to medium and bring the syrup to a rapid simmer. Cook without stirring, swirling the pan often, until the syrup turns a deep amber color, 8 to 10 minutes. Immediately remove the saucepan from the heat and stir in the pecans. Once the pecans are well coated, add the baking soda and salt and stir quickly to incorporate -- the mixture will rapidly foam and sputter as the baking soda aerates the caramel. Quickly scrape the brittle out onto the prepared baking sheet, and spread into a thin layer, os possible, before it starts to harden (which happens very quickly). Set the baking sheet aside until the brittle is completely cooked, 5 to 10 minutes. Chop the brittle into pea-sized bits and set aside.
  3. For the Cookies:
  4. Measure out 4 ounces (113g) of the butter, place in the bowl of a stand mixer, and set aside. Place the other 4 ounces (113g) butter in a small saucepan and cook over medium-low heat, stirring frequently until the butter comes to a boil. Continue to cook, scraping the bottom and sides of the pan constantly with a heatproof spatula, until the butter sputters, foams, and eventually you see browned bits floating about, 5 to 7 minutes. Add the browned butter to the stand mixer bowl, making sure you scrape in all the browned bits. Set the bowl aside to cool until the butter begins to resolidify, about 30 minutes.
  5. In a food processor, combine the flour, salt, and baking soda, then add half of the pecan brittle bits, and 1 cup (3.5 oz, 100g) of the oats. Blitz the mixture in long pulses until the oats and brittle are broken down and finely ground. Set side.
  6. Set the bowl of cooled butter on the mixer and attach the paddle. Add the dark brown and granulated sugars and beat on medium speed until the mixture is light and smooth but not fluffy, about 2 minutes. Scrape down the sides of the bowl, add the eggs and vanilla, and continue to beat until you have a very light and satiny mixture, about 1 minute. Scrape down the sides of the bowl and add the flour/oat/brittle mixture and beat on low until no dry spots remain and you have a soft, evenly mixed dough. Add the remaining pecan brittle bits and 1 cup (3.5 oz / 100g) oats and mix on low again just until dispersed. Fold the batter several times with a flexible spatula to ensure everything is evenly mixed.
  7. Using a 2-ounce scoop or 1/4 cup measure, scoop level portions of dough and place on a parchment-lined baking sheet as close together as possible (you'll space them out before baking). Cover the dough tightly with plastic wrap and refrigerate the dough for at least 12 hours and up to 48. (If you're pressed for time, a couple of hours in the fridge will do. Just note the baked cookies won't be as chewy).
  8. When you're ready to bake, arrange two oven racks in the upper and lower thirds of the oven and preheat to 350F. Line two large rimmed baking sheets with parchment paper, or silicon sheets.
  9. Place 6 pieces of chilled cookie dough on each of the prepared baking sheets, spacing so they're at least 3 inches apart. Bake the cookies on the upper and lower racks until they are dark golden brown around the edges, 16 to 20 minutes, switching racks and rotating the sheets front to back after 12 minutes. Allow the cookies to rest for 5 minutes on the baking sheets, then use a metal spatula to transfer the cookies to a wire rack to cool.
  10. Carefully move one of the oven racks to the center position, place the remaining dough on one of the baking sheets (it's okay if it's still warm), and bake on the center rack (this last sheet might bake a bit faster than the first two).
Recipe from Dessert Person by Claire Saffitz
Claire Saffitz's Oat and Pecan Brittle Cookies, by freshfromthe.com.

Tuesday, January 5, 2021

Chewy Chocolate Cookies

Recipe for Chewy Chocolate Cookies by freshfromthe.com
From the pictures alone, you may not think these cookies look like much. Just a generic chocolate cookie with some chocolate chunks, what's to write home about here? Well, quite frankly, a lot! These cookies were an unexpected amazement when I was baking up some holiday cookie packages to send to my grandparents. I'm not always the hugest chocolate fan, particularly when it's chocolate on top of chocolate (I mean, give me a chocolate chip cookie any day, but I'd always choose that over a chocolate chocolate chip cookie, if you know what I mean). 
Recipe for Chewy Chocolate Cookies by freshfromthe.com
So what makes these so good? They are so soft! They don't appear soft from the outside or when you're just giving them a gander in these pictures. In fact, you might think they look dry or something. But they are NOT. They stayed delightfully chewy and soft on the inside for over a week in an airtight container! That's some lasting power, especially when a lot of cookies will start to be dry and blegh after just a couple days.
Recipe for Chewy Chocolate Cookies by freshfromthe.com
Now, in the original recipe they're going to tell you that you need a lot of fancy chocolate to make these cookies shine. I'm here to tell you that they're good even without going super fancy. Dutch processed cocoa powder? I used Trader Joe's. Callebaut Intense Dark L-60-40NV baking chocolate? Try some Guittard bittersweet chocolate picked up at your local grocery. I also did not want to buy dark corn syrup just for this recipe, so I used light corn syrup instead and - still delicious! The point is, while those extra fancy ingredients may make them taste better, they're still awesome without them.

Write recipe photo description here

Soft and oh-so-chocolatey cookies that last for days.

Ingredients:
  • 1/3 cup granulated sugar (about 2.5 ounces), plus 1/2 cup for coating
  • 1 1/2 cups all-purpose flour (7.5 ounces)
  • 3/4 cup Dutch-processed cocoa powder
  • 1/2 teaspoon baking soda
  • 3/8 teaspoon salt
  • 1/2 cup dark corn syrup
  • 1 large egg white
  • 1 teaspoon vanilla extract
  • 12 tablespoons (1.5 sticks) unsalted butter, softened
  • 1/3 cup packed dark brown sugar (2.5 ounces)
  • 4 ounces bittersweet chocolate, chopped into 1/2 inch pieces
Instructions:
  1. Adjust oven rack to middle position and heat oven to 375F. Line a baking sheet with parchment paper or a silicon baking mat. Place 1/2 cup granulated sugar in a shallow baking dish or pie plate. Whisk flour, cocoa powder, baking soda, and salt together in medium bowl. Whisk corn syrup, egg white, and vanilla together in a small bowl.
  2. In a stand mixer fitted with the paddle attachment, beat butter, brown sugar, and remaining 1/3 cup granulated sugar at medium-high speed until light and fluffy, about 2 minutes. Reduce speed to medium-low, add corn syrup mixture, and beat until fully incorporated, about 20 seconds, scraping bowl once with a rubber spatula. With mixer running at low speed, add flour mixture and chopped chocolate; mix until just incorporated, about 30 seconds, scraping bowl once. Give the dough a final stir with rubber spatula to ensure that no pockets of flour remain at the bottom. Chill dough 30 minutes to firm slightly (do not chill longer than 30 minutes).
  3. Divide dough into 16 equal portions; roll between hands into balls about 1½ inches in diameter. Working in batches, drop 8 dough balls into baking dish with sugar and toss to coat. Set dough balls on prepared baking sheet, spacing about 2 inches apart.
  4. Bake, rotating the baking sheet halfway through baking, until cookies are puffed and cracked and edges have begun to set but centers are still soft (cookies will look raw between cracks and seem underdone), 10 to 11 minutes. Do not over-bake.
  5. Cool cookies on baking sheet 5 minutes, then use wide metal spatula to transfer cookies to wire rack; cool cookies to room temperature. Repeat with second batch of cookies.
Recipe from Cook's Illustrated
Recipe for Chewy Chocolate Cookies by freshfromthe.com

Thursday, October 29, 2020

Butterscotch Cream Pie

Recipe for Butterscotch Cream Pie by freshfromthe.com
Fall is a time to go rustic, don't you think? And what better way to go rustic than with a pie! To be honest, I'd never really heard of Butterscotch Cream Pie before I stumbled upon this recipe recently, but once I did I thought it sounded delicious. Why are we not making more cream pies these days? To be fair, when you think fall, you don't really think cream pie, but when you think summer, you don't necessarily think butterscotch either, so this might be just the ticket to cross that divide.
Recipe for Butterscotch Cream Pie by freshfromthe.com
Making any pie for me can be pretty annoying, though. I'm just not one with the pie crust, you guys. If it's your simple ground up crackers crust, great, but when it's this type of situation where I have to chill and roll and chill and blind bake and all that jazz, it always feels rather daunting. I need a better rolling pin, that's number one, and maybe it wouldn't be so bad. And, if I'm being honest, this crust did break on me when it blind baked. Does that matter in the end? Not really. Because you make the filling separately and it's already semi-set when you put it into the pie, it doesn't seep through, so it was really no big deal. And, it must be admitted that a traditional pie crust holds up a lot longer than a graham cracker one, which loses its crunch and crispness very quickly.
Recipe for Butterscotch Cream Pie by freshfromthe.comDoes this pie scream butterscotch at you? No. It's a delicate flavor, and if I didn't tell you it was butterscotch ahead of time, you'd probably just think it was some kind of sugary cream pie. And you wouldn't be wrong. Essentially what you're making here is a pastry cream filling with a whipped cream topping. Ain't nothing wrong with that, friends. 

Write recipe photo description here

A rustic and delicately delicious cream pie.

Ingredients:
    Graham Cracker Coated Pie Shell
  • 1 1/4 cups all-purpose flour
  • 1/2 teaspoon salt
  • 1 tablespoon granulated sugar
  • 6 tablespoons unsalted butter, chilled, cut into 1/4 inch pieces
  • 4 tablespoons vegetable shortening, chilled
  • 3-4 tablespoons ice water
  • 1/2 cup graham cracker crumbs (about 3.5 full crackers ground up)
  • Butterscotch Cream Filling
  • 1/4 cup cornstarch
  • 1/4 teaspoon salt
  • 1/2 cup evaporated milk
  • 5 large egg yolks
  • 6 tablespoons unsalted butter
  • 1 cup light brown sugar
  • 2 cups whole milk
  • 1 1/2 teaspoons vanilla extract
  • Whipped Cream Topping
  • 1 cup heavy cream
  • 2 tablespoons powdered sugar
  • 1/2 teaspoon vanilla extract
Instructions:
  1. For the Crust: Mix flour, salt, and sugar in food processor fitted with the steel blade. Scatter butter pieces over mixture, tossing to coat butter with a little of the flour. Cut butter into flour with five one-second pulses. Add shortening; continue cutting in until flour is pale yellow and resembles coarse cornmeal, with butter bits no larger than a small pea, about four more one-second pulses. Turn mixture into medium bowl.
  2. Sprinkle 3 tablespoons of the water over mixture. Using rubber spatula, fold water into flour mixture, then repeatedly press down on dough mixture with broad side of spatula until dough sticks together, adding up to 1 tablespoon more water if dough will not come together. Shape dough into ball with hands, then flatten into 4-inch wide disk. Dust lightly with flour, wrap in plastic, and refrigerate 30 minutes before rolling.
  3. Generously sprinkle 18-inch work area with 2 tablespoons graham cracker crumbs. Remove dough from wrapping and place in center of work area. Scatter a few more crumbs over disk top. Roll dough from center to edges to make 9-inch disk, rotating a quarter turn after each stroke and sprinkling additional crumbs underneath and on top, as necessary, to heavily coat dough. Flip dough and continue to roll, without rotating, into 13-inch disk just under 1/8-inch thick.
  4. Fold dough in quarters, then place dough point in center of 9-inch Pyrex pie pan. Unfold dough to cover pan completely, with excess dough draped over pan lip. Trim and flute crust.
  5. Refrigerate dough until firm, about 30 minutes. Prick shell at 1/2-inch intervals to keep dough from ballooning during baking (illustration 5). Press a doubled 12-inch square of aluminum foil inside pie shell. Prick foil to prevent further ballooning. Refrigerate to let dough relax, at least 30 minutes longer. Note: I used parchment paper with pie weights instead of pricked aluminum foil.
  6. Adjust oven rack to lowest position and heat oven to 400 degrees. Bake, checking occasionally for ballooning, until crust is firmly set, about 15 minutes. Reduce oven temperature to 350 degrees, remove foil, and continue to bake until crust is crisp and golden brown in color, about 10 to 15 minutes longer. Transfer to wire rack and cool completely.
  7. For the Filling: Dissolve cornstarch and salt in evaporated milk; whisk in egg yolks and set aside.
  8. Meanwhile, heat butter and brown sugar in medium saucepan over medium heat until candy thermometer registers 220 degrees, about 5 minutes. Gradually whisk in whole milk. Once sugar dissolves, gradually whisk in cornstarch mixture. Continue cooking until mixture comes to boil; cook 1 minute longer. Turn off heat, then stir in vanilla. Pour filling into shallow pan (another pie pan works well). Put plastic wrap directly over filling surface to prevent skin from forming; cool until warm, 20 to 30 minutes. Pour filling into pie shell and, once again, place sheet of plastic wrap over filling surface. Refrigerate until completely chilled, at least 3 hours.
  9. Whip cream to soft peaks. Add confectioner's sugar and vanilla; continue to whip to barely stiff peaks. Spread over filling and refrigerate until ready to serve.
Recipe from Cook's Country

Recipe for Butterscotch Cream Pie by freshfromthe.com

Sunday, October 4, 2020

Pumpkin Cheesecake Bars

Pumpkin Cheesecake Bars by freshfromthe.com
October is here! It's time to bust out your orange Kitchenaid mixer (for real though, does anyone own an orange Kitchenaid mixer?!), get yourself some canned pumpkin, whip up some pumpkin pie spice (or buy it), and get to town on your favorite pumpkin recipes. I have made quite a few different pumpkin recipes over the years, with some of my favorite go-tos of the season including the classic Pumpkin Pie Cake, to the Pumpkin Coffee Cake, to some Soft Pumpkin Cookies, but I think this new one is a great addition to the repeat repertoire.

Today, we have Pumpkin Cheesecake Bars. To be honest, they taste very similar to your typical pumpkin pie, with just a slightly extra tang from the cream cheese that also gives it a very luscious creamy texture that is in many ways better than a typical pumpkin pie. 
Pumpkin Cheesecake Bars by freshfromthe.com
And, if you know me, you know I love something that doesn't require me to make a pie dough. I don't know what it is about your traditional pie dough, but anytime I think about making one, I am like "ugh." This may be to do with the fact that I don't own a very good rolling pin, so it always feels like a major hassle to roll out a pie dough to the proper thickness. So, these? Require no rolling. It has a nice, simple graham cracker crust that you liven up with some ground ginger that will smell way more potent before baking than it actually turns out. 
Pumpkin Cheesecake Bars by freshfromthe.com
As a heads up, this recipe does require some things to be softened or at room temperature. What I recommend is to take out your cream cheese and your eggs right when you're going to start up everything. As there are some substantial cooling times, your cream cheese and eggs will be ready once your pumpkin mixture and your crust have cooled. 

But what are you waiting for? If you like pumpkin pie, and you like cheesecake, this recipe is right up your alley!

Pumpkin Cheesecake Bars

A little something different than your typical pumpkin pie in easy-to-make bar form.

Ingredients:
  • 1 (15 ounce) can unsweetened pumpkin puree
  • 2 teaspoons pumpkin pie spice
  • 1/2 teaspoon salt
  • 15 whole graham crackers, broken into 1-inch pieces
  • and so on...
  • 1/4 cup (1 3/4 ounces) and 1 1/3 cups (9 1/3 ounces) granulated sugar
  • 1 teaspoon ground ginger
  • 8 tablespoons butter, melted
  • 1 pound cream cheese, softened
  • 1 tablespoon lemon juice
  • 2 teaspoons vanilla extract
  • 4 large eggs, room temperature
Instructions:
  1. Combine pumpkin, pumpkin pie spice, and salt in a small saucepan and cook over medium heat for 6-8 minutes, until it is reduced to approximately 1 1/2 cups. Cool for 1 hour.
  2. Adjust oven rack to middle position and preheat to 325F. Either grease your pan, or make a foil sling, place it in your pan, and grease that. I never do the foil sling as I'm not taking these out to serve individually.
  3. Process graham crackers, 1/4 cup sugar, and ginger in food processor to fine crumbs, about 15 seconds. Add butter and pulse until combined, about 5 pulses. Dump mixture into your prepared pan and press down into an even layer. Bake for 15-18 minutes until just starting to brown. Let crust cool completely on wire rack.
  4. Beat your cream cheese and remaining sugar on medium-low speed until smooth, about 2 minutes. Add lemon juice, vanilla, and pumpkin mixture and beat until combined. Increase speed to medium and add eggs, one at a time, and beat until incorporated. Pour over the cooled crust and spread into an even layer. Bake until edges are slightly puffed and center is set, 45-50 minutes. Let cheese cake cool on a wire rack for 2 hours. Cover with plastic wrap (or the lid if you have one for your pan), and refrigerate for at least 3 hours or up to 24 hours. If using the foil overhang, life cheesecake out of the pan and slice into 24 pieces.
Recipe from Cook's Illustrated
Pumpkin Cheesecake Bars by freshfromthe.com

As an Amazon Associate I earn from qualifying purchases from Amazon links in my posts.

Thursday, September 17, 2020

Lemon Pudding Cake

Lemon Pudding Cake by freshfromthe.com
What do you do if you find yourself with an abundance of lemons that you bought for a different recipe, a recipe which you are no longer making? Good question. I was asking myself that the other night as I noticed the lemons were starting to get, shall we say, a little squishy. On the verge of no longer being usable, unless you want a dried up lemon as a decoration, and maybe you do. But if you don't, might I recommend this Lemon Pudding Cake? 

Lemon Pudding Cake by freshfromthe.com Lemon Pudding Cake by freshfromthe.com

I've made Classic Lemon Bars before, and while that is certainly always a crowd pleaser, I wanted to try something different. And while this is called a pudding cake, it's essentially something like a souffle. You've got a lot of eggs in this situation, and it has a very fluffy, souffle-ish texture to it once it's finished. In those above pictures, you can see how it's very perky when it comes out of the oven, but as you let it sit for a bit, it deflates down. Now typically that's no good for a souffle, so that's where the difference is here - you want it to deflate down a bit so you get that pudding-like texture on the bottom. So just what does this baby look like on the inside? When you scoop it out, it can look like a general lump of stuff, so here are a couple photos from a side angle of the pan.
Lemon Pudding Cake by freshfromthe.com
As you can see, you've got a nice, pudding layer on the bottom, topped with a light, sort of sponge-y "cake" on the top. The cake melts in your mouth to combine with the denser pudding below with a delightfully fresh lemon flavor. It's easy to eat a lot of it as once because it's so deceptively light and airy, it doesn't feel as bad for you as other, heavier desserts. But there's still a lot of sugar in this thing, kids, so if you're sugar-averse, it's not the one for you, sadly.Lemon Pudding Cake by freshfromthe.com
Like I said, it's very hard to scoop it out in a nice-looking scoop, so it kind of turns into a glob like the below. But a very delicious glob. You can still see the pudding vs the cake parts, and that's what's important. You can eat it when it's cooled down but still warm, or at room temperature, both are delicious options. The original recipe says to eat it immediately, but I found it was just as good the next day. So, if you're looking to try your hand at something close to a souffle without feeling overly intimidated, give this a try, especially if you like lemon!
Lemon Pudding Cake by freshfromthe.com

Write recipe photo description here

A fluffy and tart lemon delight with a pudding-like bottom and a cake-like top.

Ingredients:
  • 1/4 teaspoon all-purpose flour
  • 2 teaspoons cornstarch
  • 1 1/4 cups sugar
  • 5 tablespoons unsalted butter, softened
  • 2 tablespoons grated zest and 1/2 cup lemon juice from about 4 lemons
  • 5 large eggs, separated
  • 1 1/4 cups whole milk, room temperature
  • 2 quarts (8 cups) boiling water
Instructions:
  1. Adjust oven rack to lowest position and heat oven to 325 degrees F. Grease 8-inch square baking dish. Whisk flour and cornstarch in bowl. With electric mixer on medium-high speed, beat 1/2 cup sugar, butter, and lemon zest until light and fluffy, about 2 minutes. Beat in yolks, one at a time, until incorporated. Reduce speed to medium-low. Add flour mixture and mix until incorporated. Slowly add milk and lemon juice, mixing until just combined.
  2. Using clean bowl and whisk attachment, beat egg whites on medium-high speed until soft peaks form, about 2 minutes (this always takes longer for me). With mixer running, slowly add remaining 3/4 cup sugar until whites are firm and glossy, about 1 minute. Whisk one-third of whites into batter, then gently fold in remaining whites, one scoop at a time, until well combined.
  3. Place kitchen towel in bottom of roasting pan (yes, you heard that right) and arrange prepared baking dish on towel. Spoon batter into prepared dish. Carefully place pan on oven rack and pour boiling water into pan until water comes halfway up the sides of baking dish. Bake until surface is golden brown and edges are set (center should jiggle slightly when gently shaken), about 60 minutes. Transfer to wire rack and let cool at least 1 hour. Serve.
Recipe from Cook's Country
Lemon Pudding Cake by freshfromthe.com

Wednesday, July 15, 2020

Triple Citrus Bars


Recipe for Triple Citrus Bars by freshfromthe.com.

If you're a fan of Key Lime Pie, or even the lesser-known Sour Orange Pie, this is another dessert to add to your repertoire. This time around, we're mixing up all three of the most famous citrus fruits - oranges, lemons, and limes - into a very easy and delectable bar form. Sour and sweet, without being overly so for either category. Honestly, I don't think you can go wrong.

The crust is made from animal crackers, which have a slightly different tang than the typical graham crackers that are used most often in pie-crusts. You could probably do it with graham crackers, too, but give it a whirl with the animal crackers. I used the organic Kirkland brand ones from Costco as they seem to have less preservatives than the typical Barnum's ones.

Recipe for Triple Citrus Bars by freshfromthe.com.

What's the hardest thing about this recipe? I guess all the zesting and juicing just because it takes some time. You can easily double this recipe to be made in a 13x9 inch pan rather than an 8x8 pan, but that IS twice as much zesting and juicing. I don't ever tend to double a recipe on my first try just to make sure I like it first. Also, can we just talk about how perfect those pieces of fruit look on the inside? Beautiful.

Now here's the real question - if I were to make these or the sour orange pie, which would I pick? They are admittedly very similar in their ingredients, these bars just have a bit more of a floral note to them thanks to the lime. I think personally I prefer the orange pie better, but I wouldn't say no to either one if set out in front of me, that's for sure.

Recipe for Triple Citrus Bars by freshfromthe.com.


Triple Citrus Bars

Tart and sweet, a perfect and floral citrus flavor explosion in a simple, easy-to-make bar.

Ingredients:
    Crust
  • 5 ounces animal crackers
  • 3 tablespoons packed brown sugar (light or dark)
  • Pinch table salt
  • 4 Tablespoons unsalted butter, melted and cooled slightly
  • Filling
  • 2 ounces cream cheese, room temperature
  • 1 1/2 teaspoons grated lime zest, minced
  • 1 1/2 teaspoons grated lemon zest, minced
  • 1 1/2 teaspoons grated orange zest, minced
  • Pinch table salt
  • 1 14 ounce can sweetened condensed milk
  • 1 egg yolk
  • 6 Tablespoons fresh lime juice, either Key lime or regular
  • 1 Tablespoon fresh lemon juice
  • 1 Tablespoon fresh orange juice
Instructions:

  1. Adjust oven rack to middle position and heat oven to 325 degrees Fahrenheit. If you are going to want to take all of the bars out at once, cut about 12-inch length extra-wide heavy-duty foil; fold cut edges back to form 7 1/2-inch width. With folded sides facing down, fit foil securely into bottom and up sides of 8-inch-square baking pan, allowing excess to overhang pan sides. Spray foil with nonstick cooking spray. If you're not going to take them all out at once, you don't need to use the foil, instead you can just spray your 8x8 pan with some cooking spray.
  2. TO MAKE THE CRUST: In workbowl of food processor, pulse animal crackers until broken down, about ten 1-second pulses; process crumbs until evenly fine, about 10 seconds (you should have about 1 1/4 cups crumbs). Add brown sugar and salt; process to combine, ten to twelve 1-second pulses (if large sugar lumps remain, break them apart with fingers). Drizzle butter over crumbs and pulse until crumbs are evenly moistened with butter, about ten 1-second pulses. Press crumbs evenly and firmly into bottom of prepared pan. Bake until deep golden brown, 18 to 20 minutes. Cool on wire rack while making filling. Do not turn off oven.
  3. TO MAKE THE FILLING: While crust cools, in medium bowl, stir cream cheese, zests, and salt with rubber spatula until softened, creamy, and thoroughly combined. Add sweetened condensed milk and whisk vigorously until incorporated and no lumps of cream cheese remain; whisk in egg yolk. Add juices and whisk gently until incorporated (mixture will thicken slightly).
  4. TO ASSEMBLE AND BAKE: Pour filling into crust; spread to corners and smooth surface with rubber spatula. Bake until set and edges begin to pull away slightly from sides, 15 to 20 minutes. Cool on wire rack to room temperature, 1 to 1 1/2 hours. Cover with foil and refrigerate until thoroughly chilled, at least 2 hours.
  5. If you used foil, then loosen the edges with a paring knife and lift bars from baking pan using foil extensions; cut bars into 16 squares and serve. If you did not, you can just store the pan in the fridge covered with foil or saran wrap, and cut out pieces as you like.
Recipe from Cook's Country

Recipe for Triple Citrus Bars by freshfromthe.com.

Saturday, June 20, 2020

Peanut Butter and Jelly Cookies


Friends, please go make these cookies. Unless you can't eat peanut butter, and honestly? That just makes me super sad. You're missing out, and I'm sorry. Because these cookies are SO. GOOD. Especially if you liked eating the classic PB&J sandwiches as a kid. Or as an adult, I don't judge.


These cookies are big, bakery-style cookies. You're really probably eating like 2-3 regular-sized cookies when you eat just one of these. But they are so worth it. I adjusted the original recipe slightly to add in more jam. It felt like there was just a slight hint of jam in the original -- it was more of a peanut butter cookie. And still a delicious one at that, but to get a real PB&J vibe, I added a bit more jam per cookie and yes, I'd recommend the extra jam. You'll get more ooey gooey oozing, but do we have a problem with that? No. 

It's just so nice to eat this cookie and get to the peanut buttery, jelly filled center. And? It's not hard to make. You can be eating these cookies in about an hour from start to finish. Honestly, enough with the talk. Get on it!


Peanut Butter and Jelly Cookies

Your favorite childhood sandwich turned into your new favorite cookie.

Ingredients:
  • Abt 10 Tablespoons (162 grams) crunchy peanut butter
  • 1 1/2 cups (253 grams) all-purpose flour
  • 1 1/2 teaspoons baking soda
  • 1 teaspoon kosher salt
  • 1 cup (265 grams) creamy peanut butter
  • 1/2 cup (140 grams) granulated sugar
  • 1/2 cup (120 grams) light brown sugar
  • 8 Tablespoons (113 grams) unsalted butter, room temperature
  • 2 large eggs
  • 1 1/2 teaspoons vanilla extract
  • 10 heaping teaspoons strawberry jam or preserves
Instructions:
  1. Dollop the crunchy peanut butter into 10 equal-sized pieces (a little less than 1 tablespoon each) on a sheet tray or plate and freeze until ready to use.
  2. Heat the oven to 375°F. Whisk together the flour, baking soda, and salt in a small bowl.
  3. Either using a large bowl and hand mixer, or your stand mixer fitted with the blade attachment, beat the creamy peanut butter, sugars, and butter until light and fluffy, 2 to 3 minutes. Add the eggs one at a time and make sure the first is fully incorporated before adding the next, then add the vanilla and beat until smooth. Add the dry ingredients and mix until fully incorporated, then roll the dough into 10 equal-sized balls and place on a parchment paper-lined (or you canuse a silicon liner) baking sheet.
  4. Working with one ball of dough at a time, flatten the ball into a 3-inch circle in the palm of your hand. Add in about 1 heaping teaspoonful of the jam, then a dollop of the frozen peanut butter. Carefully seal the dough around the peanut butter and jam and roll it back into a ball. Some of the jelly may ooze out slightly, and that's ok! Repeat with the remaining cookie dough.
  5. Divide the dough among 2 parchment paper-lined baking sheets and bake, turning once halfway through, until golden on top, 15 to 17 minutes. Cool slightly, then transfer to a cooling rack to cool completely before serving.
  6. *I don't like using two cookie sheets in the oven at a time, so instead I put all 10 balls in step three onto a cutting board, then did five for the first batch on one cookie sheet, baked those, and then the last five for the second batch on that same sheet. I'm leaving the original instructions in case you have two and prefer to do that, but just know you don't have to do it that way!
Adapted slightly from a recipe by Farideh Sadeghin