Showing posts with label yeast. Show all posts

Sunday, April 5, 2020

Monkey Bread


Monkey Bread by freshfromthe.com.

True story: these photos were all taken with the iPhone 11 Pro, and I have to say they turned out pretty good. Portrait mode could be a game changer for bloggers who don't have the money to buy both a fancy camera (and learn how to use it) and a cellphone. Because honestly this looks pretty close to what I'd be able to do on a fancy camera with my basic skills, and the iPhone autocorrects the lighting as well, because it was fairly dark in the room too when I took these.

I promise, this isn't an ad for an iPhone! I just was impressed and thought I'd share.

Monkey Bread by freshfromthe.com.

I've made another version of Monkey Bread on here before that is very similar to this version. There are a few key differences - this one you make all at once, whereas the other you let sit in the fridge overnight, this one uses rapid rise yeast, whereas the other uses active dry, and this one just has a plain glaze whereas the other one uses one with orange extract added. So, if the other version sounds better to you, head on over and check it out.

Also, you may be wondering - where is the glaze in these photos? I think I put it on too soon, and it just started to melt right into it, soooo oh well. It still looks awesome without it, right? Yes, of course it does.

Monkey Bread by freshfromthe.com.

But, I'm gonna keep this short, so you don't have to read a bunch of stuff before getting to the actual recipe, because I know how I hate that when I'm reading blogs.

Monkey Bread

A breakfast classic alternative to cinnamon rolls.

Ingredients:
    For the Dough
  • 2 Tablespoons unsalted butter, softened, plus 2 Tablespoons, melted
  • 1 cup warm milk (about 110 degrees F)
  • 1/3 cup warm water (about 110 degrees F)
  • 1/4 cup granulated sugar
  • 1 package rapid-rise or instant yeast
  • 3 1/4 cups all-purpose flour, plus extra for work surface
  • 2 teaspoons table salt
  • For the Brown Sugar Coating
  • 1 cup packed light brown sugar
  • 2 teaspoons ground cinnamon
  • 8 Tablespoons unsalted butter (1 stick), melted
  • For the Glaze
  • 1 cup confectioners' sugar
  • 2 Tablespoons milk
Instructions:

    For the Dough
  1. Adjust oven rack to medium-low position and heat oven to 200 degrees. When oven reaches 200 degrees, turn it off. Butter Bundt pan with 2 tablespoons softened butter. Set aside.
  2. In large measuring cup, mix together milk, water, melted butter, sugar, and yeast. Mix flour and salt in standing mixer fitted with dough hook. Turn machine to low and slowly add milk mixture. After dough comes together, increase speed to medium and mix until dough is shiny and smooth, 6 to 7 minutes. Turn dough onto lightly floured counter and knead briefly to form smooth, round ball. Coat large bowl with nonstick cooking spray. Place dough in bowl and coat surface of dough with cooking spray. Cover bowl with plastic wrap and place in warm oven until dough doubles in size, 50 to 60 minutes.
  3. For the Sugar Coating:
  4. While dough is rising, mix brown sugar and cinnamon together in bowl. Place melted butter in second bowl. Set aside.
  5. To Form the Bread:
  6. Gently remove dough from bowl, and pat into rough 8-inch square. Using bench scraper or knife, cut dough into 64 pieces.
  7. Roll each dough piece into a ball. Working one at a time, dip balls in melted butter, allowing excess butter to drip back into bowl. Roll in brown sugar mixture, then, following photo 4 below, layer balls in Bundt pan, staggering seams where dough balls meet as you build layers.
  8. Cover Bundt pan tightly with plastic wrap and place in turned-off oven until dough balls are puffy and have risen 1 to 2 inches from top of pan, 50 to 70 minutes.
  9. Remove pan from oven and heat oven to 350 degrees. Unwrap pan and bake until top is deep brown and caramel begins to bubble around edges, 30 to 35 minutes. Cool in pan for 5 minutes, then turn out on platter and allow to cool slightly, about 10 minutes.
  10. For the Glaze:
  11. While the bread cools, whisk confectioners' sugar and milk in small bowl until lumps are gone. Using whisk, drizzle glaze over warm monkey bread, letting it run over top and sides of bread. Serve warm.
Recipe thanks to Cook's Country

Monkey Bread by freshfromthe.com.

Tuesday, December 1, 2015

Honey Butter Pull Apart Rolls


 Recipe for Honey Butter Pull Apart Rolls by freshfromthe.com.
No holiday meal is complete without some rolls, am I right? Now, you could go the normal dinner roll variety, or just buy some at the store, but what fun is that? For Thanksgiving, I made these delicious pull apart rolls. To be honest, I've always loved the store-bought version of these my grandparents usually have at their holiday functions, so I figured why not try to make them from scratch?

There's something fun about being able to pull apart your roll into bits that are already supposed to be pulled apart, you know? It's a tactile experience. As a note, my rolls may be a bit poofier than yours may turn out. I had to let mine sit on the counter before going into the oven for a bit, so they started rising again thanks to the yeast. It may have just made them even fluffier and more delicious, but I guess I'd have to do another batch to be sure. Oh darn!
 
Recipe for Honey Butter Pull Apart Rolls by freshfromthe.com.

As you can see from the below photo, it can also be quite pretty. The below roll is from all of the scrappy end pieces when I was cutting up the dough. I thought oh this one will be the runt of the litter and be a bit sad, but instead it turned out looking something like a flower, almost. Really, you could get creative and make all of you rolls look like flowers, I'm sure, but you can also just be more precise in your cutting and have all of your rolls be "regular" like the one above.

Now, this may seem like a lot of work, but they're actually quite easy to make when you get down to it. The only thing is the time issue. Because you are working with yeast here, it's not like you can just make these on a whim to have in a few minutes' time. But I don't think you'll be disappointed if you do decide to make these! They're delicious right from the oven, and days later when you microwave them for about 30 seconds. Yum!

Recipe for Honey Butter Pull Apart Rolls by freshfromthe.com.

Honey Butter Pull Apart Rolls by freshfromthe.com

The perfect rolls for a special holiday meal.

Ingredients:
  • 1 ½ cups hot water
  • 1 Tablespoon active dry yeast
  • 2 Tablespoons granulated sugar
  • 2 Tablespoons vegetable oil
  • 1 teaspoon salt
  • 3 ½ to 4 cups bread flour
  • 3/4 stick unsalted butter, melted
  • 3 Tablespoons honey
  • 3/4 teaspoon salt
Instructions:
  1. Spray a large bowl with cooking spray - set aside for now.
  2. In a small bowl, mix together the water, yeast, and sugar. Let sit until frothy, about five minutes.
  3. In a large bowl, mix together the oil, salt, 2 cups of flour, and the yeast mixture until combined well.
  4. Stir in the remaining flour, 1/2 cup at a time, until the dough pulls away from the sides of the bowl and isn't too sticky.
  5. Turn out onto a floured surface and knead until elastic, about 8 or so minutes. As a tip, I used about 3 1/2 cups flour in the bowl, then probably added another 1/2 cup when kneading to keep it from being too sticky. You can use a stand mixer with a dough hook, but I did it by hand.
  6. Place the dough in the greased bowl, cover with plastic wrap, and keep in a warm place until doubled in size, about an hour.
  7. After doubled, punch down the dough and lay on a floured surface. Roll out the dough until about 20 inches by 12 inches.
  8. Preheat your oven to 375°F.
  9. In a small bowl, mix together the butter, honey, and salt, and brush the dough with half of this mixture.
  10. With a pizza cutter (or a knife if you don't have one), cut the dough lengthwise into sixths, and crosswise into twelfths.
  11. Make stacks of four dough squares and place each stack into a greased muffin cup. They should have the ends of the stacks placed down into the muffin so you will see the layers.
  12. Brush with the remaining butter mixture (I had a little extra that I used later to butter the rolls once they were done baking) and bake for 13-15 minutes until golden brown. Serve warm.

Recipe via High Heels and Grills

Recipe for Honey Butter Pull Apart Rolls by freshfromthe.com.

Thursday, October 24, 2013

Challah Bread

Challah holla!

Sorry, I had to do it. 

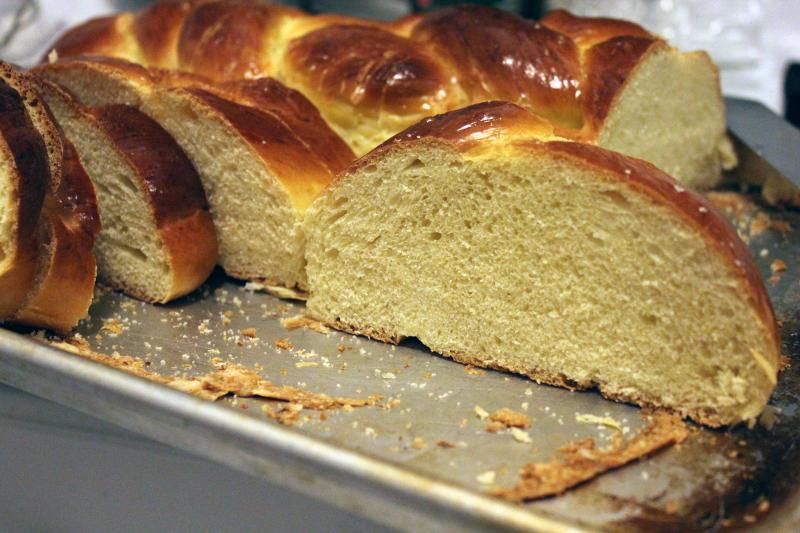
Challah Bread by freshfromthe.com

Did you know, I'd never had challah bread before making this homemade version? It's true. Unless I ate it unbeknownst to me at a restaurant at some point, which I suppose is entirely possible. Truth be told, I had never even heard of it until probably a few years ago. Or if I did hear it, I probably thought someone was just saying holla and didn't think twice.

Which is really sad, because ummmm.... this bread is pretty great. And I love me some bread. It's not without some work, mind you, but you'll probably be really happy you put in the time once it's done. Plus, this makes two loaves, so you'll feel really accomplished, and you can totally freeze one for later so you don't have to do it all again.


This bread is particularly great for things like french toast, which is always better with a thick bread, grilled cheese sandwiches, and even BLTs with your pieces just toasted. Tell me you don't want to take a big bite into that right there. Bacon, lettuce, tomatoes, and even some avocado too, plus homemade bread? Yes please.

I will not lie to you, though, the braiding part is kind of hard. Unless you've done it a bunch of times already, then it's probably easy peasy lemon squeezey, but I only know how to do a basic regular braid, man. I can't even do the fancy french braids the girls used to do in junior high. Or those fishtail ones? I mean, that was entirely foreign. Ah, the days when we'd braid our hair during leadership class... good times, good times.

Challah Bread by freshfromthe.com

The classic braided Challah Bread, great for French toast, sandwiches, and just to eat with some butter slathered on!

Ingredients:
  • 1 ½ packages active dry yeast
  • 1 Tablespoon plus ½ cup granulated sugar
  • 1 ¾ cups lukewarm water
  • 1/2 cup olive oil (or vegetable oil)
  • 5 large eggs
  • 1 Tablespoon salt
  • 8 to 8 ½ cups all-purpose flour
Instructions:


  1. In a large bowl, dissolve the yeast and the 1 tablespoon of sugar in 1 3/4 cups lukewarm water. Not too hot, not too cold. As Goldilocks would say, juuuuust right. Let that sit for about 5 minutes to get activated and frothy.
  2. Whisk the oil into the yeast mixture, then beat in 4 of the eggs, one at a time, with the 1/2 cup remaining sugar and the salt. Gradually add in the flour, one cup at a time. When the dough holds together, it is ready for some hand kneading. You can use a mixer with a dough hook if you want, but not if you have the basic Kitchenaid like me. Doing too much dough hooking will kill your motor. Truth.
  3. Turn the dough onto a floured surface and knead until smooth and elastic. Either clean out your bowl from earlier or get another big one and grease it up. Return your dough to the bowl, greasing both sides of the dough. Cover with plastic wrap and let rise in a warm place for an hour, until almost doubled in size. Your warm place can be an oven that was heated to 150F and then turned off before you stick the dough in. After the hour has passed, punch down the dough and let rise again in that warm place for another half hour.
  4. Now it's time to form the braids. Honestly, I don't have good directions for the braiding. The ones I read were confusing, and we kind of just made it up as we went. Basically, you split your dough in half, then from that half make 6 balls the same size. Roll those balls into strands about 12 inches long and 1 1/2 inches wide. Place them in a row next to each other, pinch the tops together, then... braid. You can try following these directions. After you've got your braid, pinch the bottom ends together. Repeat with your second half. You can also turn it into a circle if you prefer.
  5. Place the loaves on a greased cookie sheet about two inches apart. Beat your 1 leftover egg and brush it on the loaves. Let rise another hour, and keep that egg for after the hour.
  6. Preheat the oven to 375°F and brush your loaves again with the egg after the hour has passed. At this point you can sprinkle with poppyseeds if you so desire. Bake in the middle of the oven for 30-40 minutes, until golden. If you have a fancy thermometer, the insides should be 190°F. Cool the loaves on a rack, then get to slicing!

Recipe via Smitten Kitchen

In Pictures:


 Yeast and 1 Tbsp sugar go into lukewarm water, then you whisk in 4 of your eggs and the other 1/2 cup sugar. It's very liquidy. It's fine.


Start mixing in your flour, 1 cup at a time. You'll be like oh man, there are some lumps of flour in that liquid. It's okay. They'll go away.


Keep going. You can do it! Forearm strength!


See? It can be done. It's now ready to be kneaded.


Plop!


Knead it, baby! Those aren't my hands, btw, those are boyfriend hands. We switched it up and I took most of the pictures this time, while he did a lot of the mixing and kneading and braiding!


Grease your bowl, cover it with plastic wrap, let it rise in a warm place for an hour until about doubled.


It. Shall. Rise!


Everyone's favorite part - the punch!


Wa-pow! Once you've punched it down, put the wrap back on and back in the warm place for another half hour.


It will rise again!


Take half the dough, and split that half into six balls.


Turn those balls into strands.


And braid those bits together.


Repeat with the other half. Put on a greased cookie sheet and brush with your last egg. Let rise for another hour. Preheat your oven to 375F.


After that hour, brush again with the egg. Then stick that in the oven for 30-40 minutes until golden.

Challah Bread by freshfromthe.com

Golden and delicious! Let it cool!

Challah Bread by freshfromthe.com

Then slice into it! Make some french toast. Make a BLT. Just eat it straight from the loaf. Enjoy!

Thursday, September 12, 2013

Homemade Egg Bread for Texas Toast

Can I let you in on a secret? My other yeast breads that I've made have only turned out okay. Granted, I have not made that many yeast breads, rather many quick breads. Because damn, waiting around for things to rise is kind of annoying, right?

But this bread totally turned out! It rose like crazy. The best rise in a dough I've ever made! This makes it lighter with more air pockets on the inside, which is really what makes a bread a bread.

Homemade Egg Bread for Texas Toast by freshfromthe.com

That may leave you to wonder why I would make this bread. It seems kind of random, perhaps? Well, recently I went to Phoenix and had a sandwich, a sandwich my boyfriend would come to call the best sandwich he's ever tasted. And it was made using this Texas Toast-style bread. Now, this was not my all-time favorite sandwich because it had too much aioli sauce on it, but I did like the bread. Incidentally, if you ever want to try this sandwich and you happen to be in Phoenix, it's the BLT Revival at Tonto Bar & Grill.

(P.S., my favorite sandwich appears to be this fish sandwich I had at another place in Phoenix. OMG it was GOOD. And, sadly, they don't make it at the same restaurant here in LA! What! Quelle horreur! So, if you ever go to the Hillstone in Phoenix, try out the Gulf Coast Fish Sandwich. You won't regret it!)

Anyway! I made the bread, and we ate almost a whole loaf in one day, including making some grilled cheese sandwiches for dinner. I imagine it would be amazeballs when made into french toast, so maybe I'll have to get some maple syrup that hasn't expired and try that out with the remaining loaf!

Homemade Egg Bread for Texas Toast by freshfromthe.com

Delicious homemade egg bread, perfect for Texas toast, grilled cheese, and French toast.

Ingredients:
  • 6 to 7 cups all-purpose flour
  • 2 packages active dry yeast
  • 2 cups whole milk
  • 1/4 cup granulated sugar
  • 1/4 cup (1/2 stick) unsalted butter
  • 2 teaspoons salt
  • 3 large eggs
Instructions:

  1. In a large mixer, combine 3 cups of flour with the yeast. Leave that while, in a saucepan, you heat up the milk, sugar, butter and salt until warm and butter is almost all melted, stirring constantly. Mix this in to the flour mixture, then beat in your eggs one at a time on low speed for about 30 seconds each, scraping down the sides of the bowl when necessary. Beat this mixture on high speed for 3 minutes, then stir in as much of the remaining flour as you can with a spoon (probably around 3 cups).
  2. Onto a lightly floured surface, knead the dough, adding in the last cup of flour (or so) until the dough is semi-stiff, smooth and elastic. Should take around 6 minutes. Shape this into a ball and place in a lightly buttered large bowl. Turn the ball over once to butter all sides of it. Cover with a towel and let rise in a warm place until doubled, which should take about an hour and 15 minutes. Make sure you keep it away from drafts, I usually stick this in a turned off oven.
  3. After it has doubled, punch it down and divide the dough in half. Cover again and let rest for 10 minutes. Shape into 2 loaves and place in 2 sprayed loaf pans. Cover one more time and let rise for 35 minutes until nearly double.
  4. Bake in a 375°F oven for 35-40 minutes, covering with foil for the last 15 minutes to prevent over-browning. Let cool in the pans for a few minutes, then remove to a wire rack to completely cool.
  5. Slice it up and do whatever you like - make some french toast, maybe some grilled cheese sandwiches, a BLT, or just butter it up and eat it as is!

Recipe via Just a Pinch

In Photos:


 Mix together 3 cups of flour with the 2 packages of active dry yeast in your mixing bowl.


In a saucepan, heat your milk, sugar, salt and butter until warm and the butter is almost 100% melted. You can see one little bit of butter left in the bottom right area. Done!


Mix your milk mixture into your flour mixture.


Beat in your 3 large eggs one at at time, about 30 seconds each. Then beat that for about 3 minutes on high.


Mix in as much of the remaining flour as you can with a spoon (about 3 cups for me).


Turn that out onto a floured surface and knead the last cup of flour in until the dough is semi-stiff and elastic, about 6 minutes.


Put your dough into a buttered bowl and turn over so both sides get buttered. Cover and let rise for 1 1/4 hours until doubled in a non-drafty place. Take out and PUNCH IT! I forgot to take a photo pre-punch to show you how much it grew. Trust me, it grew a lot!


Divide that dough in half and put in two bowls. Cover and rest for 10 minutes.


Then form loaf-shapes and stick them in the prepared pans (butter 'em up!). Cover and let rise again for 35 minutes until almost doubled.


Look how much they grew! Also, if you don't want a weird looking loaf, make sure you smooth out the tops, unlike that one on the left there. Stick this in your 375F pre-heated oven for 35-40 minutes, covering with foil for the last 15 to avoid too-brownness.


Take those out of the oven and voila - you have bread!


Apart from the slightly wonky top of the one loaf, this is probably the most successful yeast bread I've made! Look how tall!

Take them out of the pans and let them cool on a wire rack, then get to slicing!


We made some delicious grilled cheese sandwiches with the bread. Super rich, very yummy!

Psst! Hey you! You should totally go like my Facebook page. I'd love you forever and ever. Click and like: http://www.facebook.com/freshfromthe.com.